
You might have used reminders in Outlook before, but these tips may make you reconsider the way you use the feature.
Trying to remember appointments and tasks on your own is asking for trouble. Whether you’re in the zone or taking a break, it’s embarrassing to receive a call because you’re unknowingly late to a meeting or a conference call. That’s why there are so many apps and gadgets that help keep us on schedule; Microsoft Outlook is one of the most popular and effective solutions on this task and schedule management list.
Outlook reminders are timed messages that pop up to remind you of various work-related tasks. You can use them to manage different types of tasks, emails, meetings and appointments. Many Microsoft users already use reminders on Outlook, but it’s unlikely they’ve optimised those reminders with the right workflows and automations for their specific needs.
In this tutorial, I’ll show you how to add reminders to tasks, emails and appointments in Microsoft Outlook. Then, I’ll introduce you to a few helpful reminder settings that should help you use Outlook reminders more efficiently.
During this demonstration, I’ll be using Microsoft 365 Desktop on a Windows 10 64-bit system, but you can also use earlier versions of Outlook. If your views are a bit different from the demonstration images in this article, don’t worry. That shouldn’t keep you from following along. Outlook Mail’s online version supports reminders for tasks and appointments as well.
How to set reminders for tasks
Whether your to-do list is long or short, Outlook reminders can keep you on task, especially if a task doesn’t have a specific deadline but you want to set one for yourself.
To set a task reminder, do the following:
- Move to the Tasks window. Outlook Mail makes it possible to add a reminder to a task in the To Do window.
- Open an existing task or create a new task by clicking New Task in the New group on the Home tab.
- Choose Reminder from the Follow Up dropdown in the Tags group.
- Click the Reminder option to set a default reminder.
- Reset the default reminder options (Figure A) to a date and time in the future. In our demonstration, the user set a reminder for 2:00 p.m. the next day, which in this case was Nov. 29, 2022.
Figure A
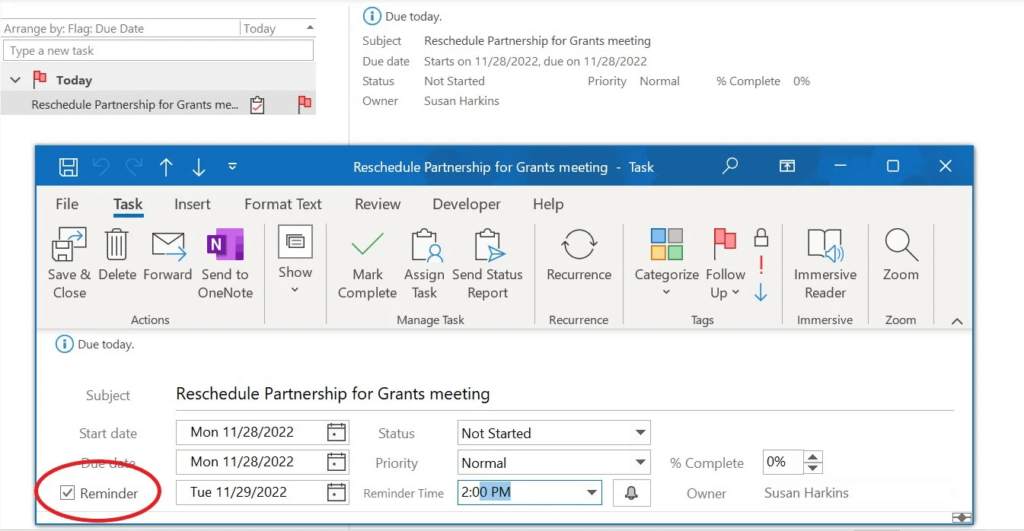
Quickly set a reminder in Outlook.
Click Save & Close.
The bell icon indicates that the task has a reminder set (Figure B). To delete the reminder, simply uncheck the Reminder option in the dialog.
Figure B
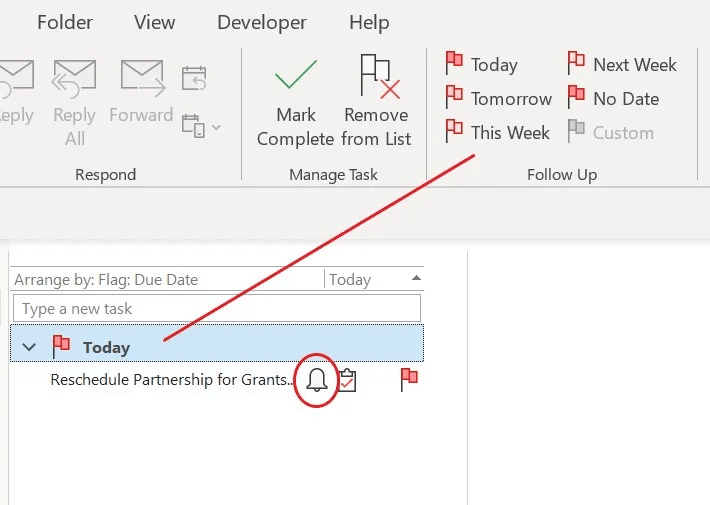
With a quick glance in Outlook, you can see this task has a reminder.
You might be wondering about the Today flag. This flag indicates that the task’s start date is today. However, that’s not a literal reference to a specific date; rather, it’s a reminder that today you need to attend to this task.
You can quickly change this by clicking the flag header, which will display the contextual Follow Up group on the ribbon. The flag isn’t a reminder — it’s an effective way to organise your tasks.
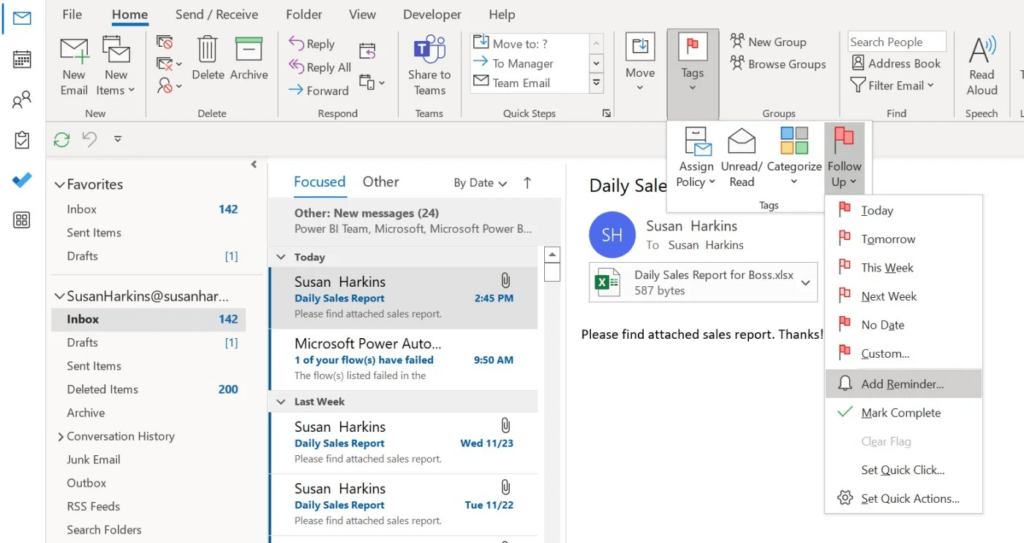
You can also set a reminder by clicking the Follow Up dropdown in the Tags group and choosing Add Reminder (Figure C).
Figure C
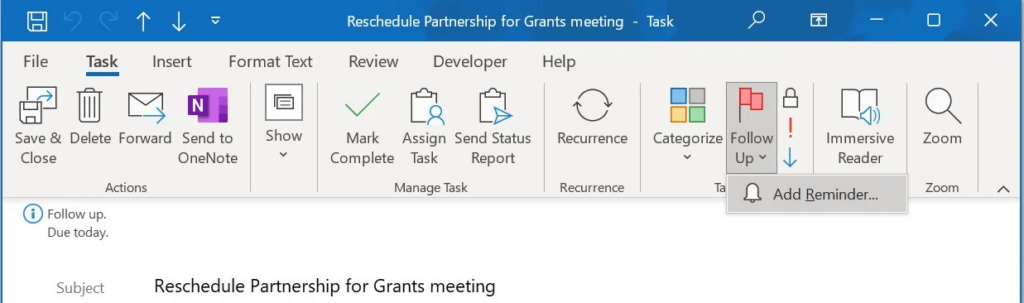
Add a reminder in Outlook.
In the resulting dialog (Figure D), set the appropriate options. If you’re also using Follow Up flags, you can set one using the dialog.
Figure D
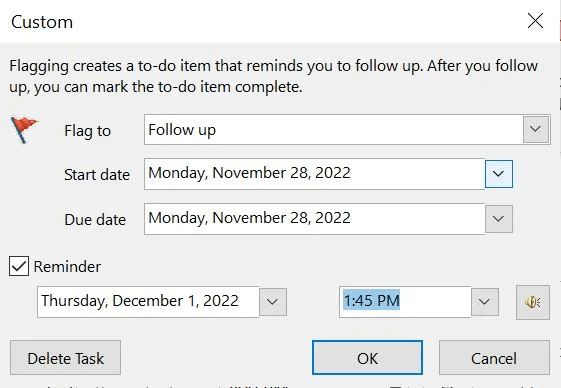
Set the reminder options in Outlook’s Custom menu.
You might find that you primarily use reminders with tasks, but you can also add a reminder to an email message. For my own work, I actually use email reminders more often than task reminders.
How to set reminders for emails
If you need to respond to an email by a certain time, you can easily add reminders in Microsoft Outlook. You must have the older POP3 type account, a business account or an Exchange account in order to do this.
If you have the newer IMAP account type, which communicates back and forth with the server so you can sync email across multiple devices, you can skip this section because you can’t set reminders for your email messages. Outlook Mail lets you set flags to email but not reminders.
At first, this idea might seem a bit odd, but once you add reminders to a few emails, you will find this capability is truly valuable for managing your inbox. Now, let’s add a reminder to an email message as follows:
In the Mail window, select the appropriate account Inbox. Select the message where you want to add a reminder in the Reading pane.
Click the Home tab, and click the Tags dropdown.
Click the Follow Up dropdown.
Choose Add Reminder from the dropdown list (Figure E).
Figure E
Select Add Reminder from the Follow Up option in the Tags dropdown in Outlook.
Set the reminder options using the same dialog you used earlier in Figure D. The reminder is set by default, so you’ll want to reset the date and time.
Click OK.
You can also set a reminder for a sent message using these instructions. You’ll find a copy of sent email messages in the Sent folder, unless you’ve changed that default option.
To set a reminder for a new message that you’re preparing to send, click Follow Up in the Tags group and choose Add Reminder from the dropdown. The resulting dialog, shown in Figure F, is a bit different from the one shown earlier in Figure D.
Figure F
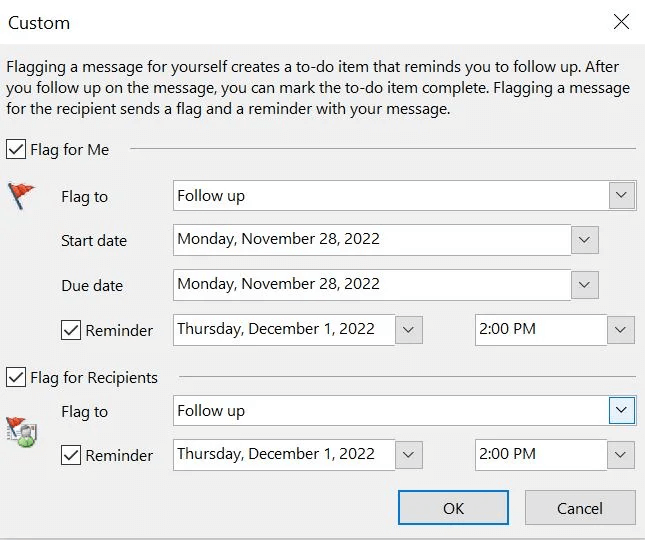
You can set a reminder for yourself and the email’s recipient in Outlook.
When sending an email, you can set a reminder for both you and the recipient. However, the recipient must have Outlook for this behavior to work.
Setting Outlook reminders for emails can save you many “oops” moments. I know that I find them invaluable. Another invaluable reminder that saves my working process on a regular basis is setting reminders with appointments.
How to set reminders for calendar appointments
You can track appointments in Outlook’s calendar, but that doesn’t guarantee you’ll show up on time for those appointments. Even if you’re sitting in front of your computer, you can easily lose track of the time — I speak from experience. Fortunately, Outlook lets us add reminders to appointments to help us stay on schedule.
To accomplish this simple task, do the following:
Click inside any appointment in a calendar.
In the contextual Options group, Click Options to display the dropdown. Outlook Mail doesn’t display this group. You must open the email message to set a reminder.
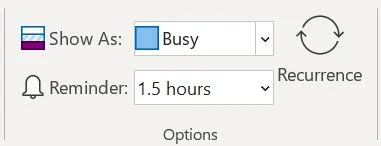
When setting a reminder for an appointment, you set an interval time, such as 18 hours or 15 minutes. Choose from this setting’s dropdown (Figure G). Alternatively, you can enter the reminder interval from the keyboard.
Figure G
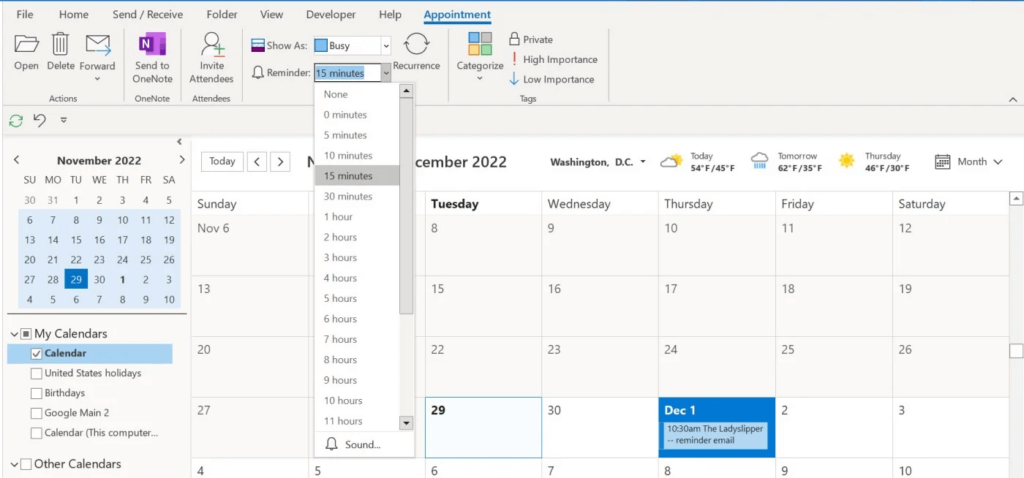
Set a reminder time in Outlook.
If the appointment is an all-day event, the default reminder is 18 hours. In those cases, Outlook would display a reminder the day before. However, if you specify a start time, Outlook defaults to a reminder 15 minutes before the meeting time. For example, if the appointment is at 10:30 a.m., Outlook will display a reminder at 10:15 a.m.
Using the dropdown or entering the interval yourself, you can change the setting. As you might expect, if you choose zero minutes from the dropdown of interval settings, you won’t get a reminder.
Clearing reminders automatically
If you set a reminder and change your mind later, you can remove the reminder for tasks and email by deselecting the reminder option you checked to set the reminder originally. Figure D showed when this reminder was enabled by the check. Whenever it’s needed, you can simply click on that box to uncheck it and remove the reminder. To clear a reminder for an appointment, you’d set the time interval to 0 minutes.
Under normal circumstances, removing individual reminders makes sense. However, you might want to remove all past reminders, which can be incredibly tedious.
Removing reminders for an event after it happens doesn’t seem necessary until you return from a two-week vacation in paradise and are immediately swamped by reminders for all of the events you missed while you were gone. It’s not a huge issue, but it is one you can avoid by setting reminders to dismiss themselves. To set up reminders in this way, do the following:
Click the File tab, choose Options in the left pane and choose Advanced.
In the Reminders section, select Automatically Dismiss Reminders for Past Events (Figure H).
Figure H

Check this option to remove all reminders for past events in Outlook.
Click OK.
That’s it! Now you can dig into two-weeks’ worth of email with minimal reminder disruptions.
How to create your own time settings
When entering time values or intervals for reminders, you can choose from preset items in a dropdown. If you can’t find the reminder amount you want in the dropdown, enter it manually. For example, suppose you want to set a reminder for an hour and a half before a meeting that’s across town. Simply enter 90 minutes. The time settings will also let you enter times manually, but remember to include the “a.m.” or “p.m.” component.
To illustrate how flexible Outlook is with entered time values, let’s work through a quick example:
Click any day or time in any calendar to display the contextual Options group on the ribbon.
There isn’t an option for 90 minutes as you saw earlier in Figure G. The closest options are 1 hour and 2 hours.
Click inside the time control, which currently displays 15 minutes.
From the keyboard enter 90 m, and click Enter. Outlook displays 90 minutes as 1.5 hours (Figure I).
Figure I
You can enter time intervals for reminders in Outlook from the keyboard.
You might have noticed that entering the single letter m was all that was necessary to indicate minutes. Outlook is quite versatile when it comes to interpreting values entered from the keyboard. The best way to learn all of the possibilities is to simply try them out.
Remember to enter the colon and the “a.m.” or “p.m.” component when you set custom time reminders. Outlook Mail doesn’t accept date and time values in the same way.
Managing recurring reminders
Many tasks are recurring and unfortunately, it’s easy to lose the reminder for a recurring task. All you have to do is click Dismiss once, and you could lose reminders for the remaining occurrences of that task or event.
To avoid this issue, instead of dismissing the task, mark the task as complete; doing so will leave the reminder settings in place. It’s easy to get confused, but you should only dismiss a recurring task when you’ve completed all instances of that recurring task.
But if you’ve lost a reminder, it’s easy to reset. To get started, open the recurring task, and set the most recent event to complete. Then, open the item to check that doing so resets the timer, just to be safe. You might have to reset other previous tasks to complete before Outlook catches on.
Outlook’s recurring tasks are flexible enough to allow for scheduling changes and missed tasks. To learn more about recurring tasks and reminders, read How to reset a recurring task in Outlook.
Reminder defaults
Outlook reminders are set by default to every 15 minutes. When you set a reminder, you can change this default setting. If you find yourself resetting it all the time, change the default to the time interval that suits you. For example, perhaps you want a 10-minute interval instead of 15. In this case, you’d set the default as follows:
Click the File menu, and choose Options.
Choose Calendar in the left pane.
In the Calendar Options section, look for Default Reminders. Click the dropdown, and choose 10 minutes (Figure J).
Figure J
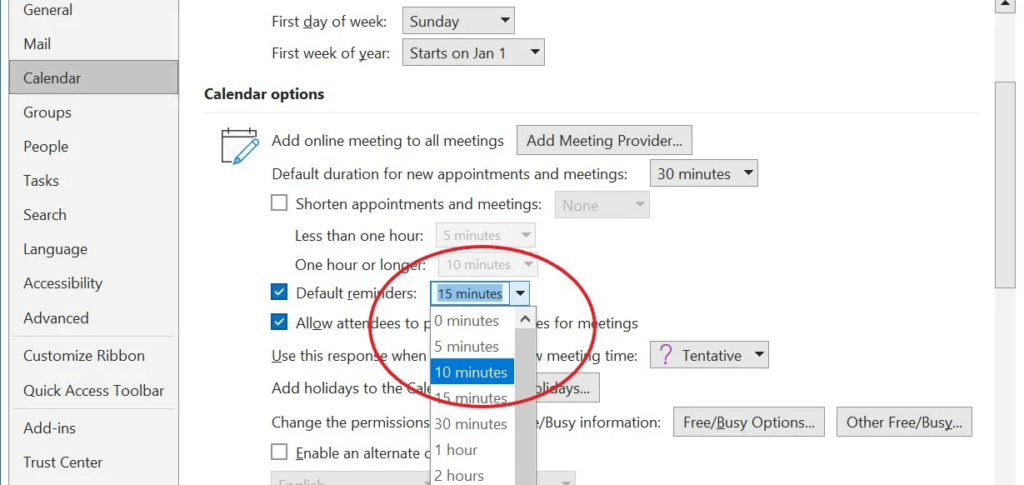
Choose a new interval for your Outlook reminders.
Click OK.
This default will reset all instances where Outlook uses an interval reminder. You can’t set new defaults in Outlook Mail.
How to make sure you see the reminder in Outlook
The biggest problem with reminders is that you often don’t see them while working. In the most recent versions of Microsoft 365, you can fix this problem by setting an option that always displays all reminders on top of all windows. So, if you’re working on a proposal in Word, Outlook will display a reminder on top of your document. It’s a nice feature.
To set this option, do the following:
Click the File tab, click Options in the pane to the left and choose Advanced.
In the Reminders section, check the Show Reminders on Top of Other Windows option (Figure K).
Figure K
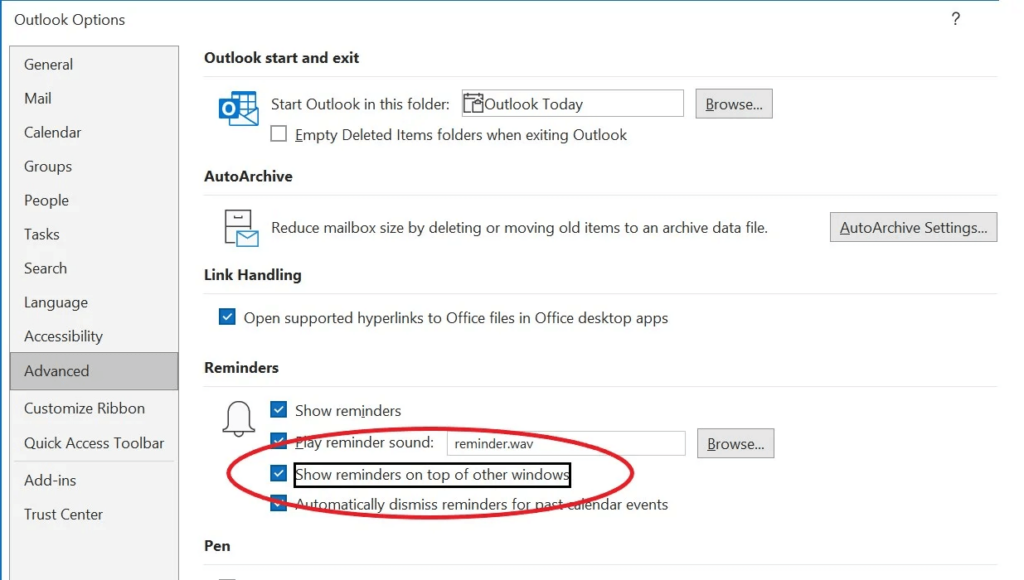
Set this option to display Outlook reminders on top of all windows.
Click OK.
Now you can return to work knowing you won’t miss a reminder again — at least not because you didn’t see it!
Source: Tech Republic